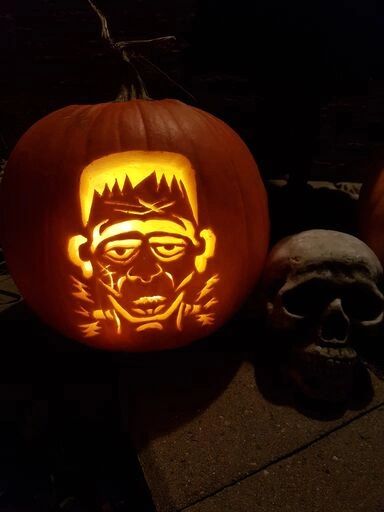
It is no secret among my friends and family that Halloween is my favourite season! What is not to love! The beautiful fall colours, the spooky decorations, the amazing costumes, and of course inspirational pumpkin carvings! I started carving “cool” pumpkins years ago when the typical jack-o-lanterns didn’t quite satisfy my creative desire. I found carving pattern books, tool sets and great ideas online that fueled the passion for something a little more unique. Here are a few tricks and tips I have learned:
It all starts with GREAT tools. Get yourself a proper pumpkin carving set. Check out this great set click here. The key is how wide the blade is that allows for more detailed carvings. Another durable tool I found was at Lee Valley; a fine keyhole saw for carving wood (click here). You can use other tools you have around the house too such as: small paring knife, melon baller, cordless drill… Once you have your tools finding a cool pattern you want to carve should be fairly easy with tons of available options. Here are a few tricks and tips I have learned over the years:

Now that you have awesome tools and patterns time to find the perfect pumpkin! Selecting the right size pumpkin for your design- Go for the big ones! Make sure it has a decent side to create your carving masterpiece. and it still has a stem attached. If you have a long design you can lay your pumpkin on the side to have a better fit.
Cutting the lid first: start by cutting into the top of the pumpkin (more on this option later) at and slight angle about 2-3″ away from the stem. The angle keeps the lid on top of the pumpkin instead of falling inside. Before your carve a complete circle offset a small notch from where you start to where you end. This gives you a clear idea of how the lid fits when you put it back on.
Cleaning out your pumpkin. This is the slimy part. Scoop and scrape out all the pulp and seeds,. Once the inside is clean determine which side your design is going on and continue to scrape away the inside wall of the pumpkin making it thinner and easier to carve details. This is the critical secret to great pumpkin designs. The wall should be approximately 1/2″ or 1cm thick for best results.

Selecting your pattern: the internet is filled with spectacular designs Click here: For your first attempt keep the pattern a basic without enormous detail. Before you place your pattern cut out the parts that will be cut out of your pumpkin. I find using an Exacto-knife on a cutting matte makes this easier than using scissors. Once your pattern is prepared use straight pins to hold the pattern in place on your pumpkin. Because paper is flat and pumpkins have a curve you may find some spots that need to be tucked or folded to ease the design onto the surface. Use as many pins to keep the paper flat to the side of your pumpkin. This will keep your design transfer more accurate and easier to follow once you remove the paper before carving.
Trace out the design on to your pumpkin using a permanent marker. Make sure you indicate which parts are to be cut out and parts that are staying intact, as this can be confusing with complex designs. (don’t worry about the marker being visible as it easily comes off with nail-polish remover or acetone when you are done). More intricate designs also have scraped parts (removing the outside skin of the pumpkin, this is where a thinner wall is important as thinner walls allow light to shine through the flesh).

Start carving, depending on the level of detail I will often start on the small parts in the middle as the flesh of the pumpkin is more stable when there are less cuts. Beginning with the more detailed parts can prevent breakage when you get to the areas around. The key is to have a very narrow serrated carving knife as this allows a slow sawing motion to follow curves and changes of direction without compromising the flesh of your pumpkin. Take your time, plan your cuts
Don’t worry about removing the cut out pieces right away. Again this can keep the pumpkin more stable with detailed designs and patterns. The pieces can be pushed inside and removed later or pulled out the front. Once you have finished all the carving scoop out the bits and pieces and rinse out your pumpkin in the sink to remove any loose pieces.
As mentioned not all patterns need a lid on top; You can cut out the bottom (similar size hole) of a pumpkin too and place over your light source. With great pumpkins comes a decent amount of time commitment. This is not something you can pull off in 15-20 minutes. Expect to spend about an hour per pumpkin.
Because I enjoy have multiple “cool” pumpkins I will often carve a few days before Halloween or if you are hosting a party the weekend before you still want your creation to be in good shape for trick-or-treaters: TIP: small narrow cuts can dry out over several days, I have been able to revive a carved pumpkin by soaking in room temperature water for a few hours. It will re-hydrate the flesh and look like it was freshly carved! Just make sure to not let a carving dry out too much (where pieces break) that it can’t be revived. Most of all HAVE FUN! And one last thing, YES I have carved all the pumpkins shown here!
Check back next week as we go into budget friendly ways to decorate your home for the occasion!


